Mostrando entradas con la etiqueta AICLE. Mostrar todas las entradas

lunes, 3 de septiembre de 2018

¡Pon un #eTwinning en tu clase!

Como todos los años vamos a seguir con los proyectos eTwinning en el centro y animo a que cada vez haya más docentes y clases implicadas en este tipo de proyectos puesto que abren las puertas a nuevas metodologías.
Regístrate para recibir noticias recientes al boletín eTwinning.
Si eres nuevo en eTwinning, te recomiendo que entres en:
'Beginning in eTwinning' donde encontrarás mucha información sobre la plataforma y cómo comenzar nuevos proyectos.

¿Necesitas más ideas sobre proyectos de referencia, independientemente de los que se han llevado en el centro? Entonces, sólo tienes que entrar en los proyectos destacados eTwinning.

jueves, 15 de marzo de 2018

Vertebrates and Invertebrates in 3rd grade

In our 3rd grade class we have been learning about vertebrates, invertebrates and the different classifications of animals.

Did you know a fish is an amphibian, a snake is a reptile, and a deer is a mammal?

Humans are also mammals, we are viviparous meaning we come from our mother´s womb. Oviparous animals produce eggs that hatch from the female´s body.

Our class made beautiful, colorful photos of different animals to help us learn & understand their characteristics! We decorated the windows of our classroom with our drawings. On the front is a picture of the animal and the back is a list of characteristics.

Thank you students of 3rd grade!


martes, 6 de marzo de 2018

Portfolio about animals in 1st grade!

Kids can work Science in the class in different ways. We would like to share with all of you how we did it with the unit about animals in 1st grade.

martes, 20 de junio de 2017

Funny art projects!: from children bookmarks to origami

Every child loves drawing, origami and painting. As teachers we can offer them some methods of expressing themselves. This way we encourage them to experiment with different techniques. This is what we have been doing in our 3rd and 4th grade during this term.
Spend time with your students and have fun with this basic origami in your art classes! Here you are some of my students' designs. 
  • 1st Technique: Children bookmarks

They are useful, adorable and they can make your students happier in your lessons.


  • 2nd technique: Flexagons
It is a fascinating geometric toy! Flexagons are folder paper polygons that can be flexed. They change form flexagon to flexagon very quick. It is a good way to teach your students the third dimension and to find hidden surfaces at the same time they learn geometry.


How to make this great paper toy, the Flexagon? Check this video!

  • 3rd Technique: Funny toothy pictures!

Surprise and laughs! Our students created crazy creatures just with a piece of paper. Very easy and fun for your class. Isn't is wonderful? 


  • 4th Technique: Ancient jars

After our history lessons about Greece and Rome, it was a good idea to work some art techniques about it. So Ancient Greece and Rome overloaded our class! Each child received a piece of paper with the shape of the jar and they decorated it. They really got into it and did all kinds of decorations, as geometric patterns.


viernes, 2 de junio de 2017

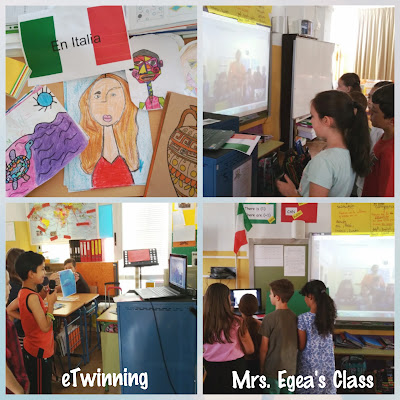
Hangout abriendo fronteras en eTwinning: "See you next year"

eTwinning siempre tiene momentos para el encuentro entre el centro "Don Saverio Valerio" de Gravina in Plugia en Italia y nuestro colegio . Con la cercanía del cierre del proyecto al final de curso, hemos vuelto a reunir a las clases a través de un hangout para intercambiar las experiencias vividas a través de este trimestre sobre "Education Creates Smiles"
En este caso ha estado lleno de pinceladas y de color a través de la historia del arte y las obras seleccionadas por los países sobre Modigliani, Franz Marc y Picasso
Una de las tareas más interesantes del hangout ha sido descubrir a qué artistas pertenecían las obras en grupos, así como explicar porqué se sabía a través de evidencias utilizando el inglés. Ha habido también juegos de italiano y español para sensibilizar al alumnado sobre lo similares que son las lenguas procedentes del latín y se le ha dado una pincelada final a estas lenguas a través de un poema en italiano que nos propusieron para estudio de Gianni Rodari, autor muy querido en esta clase, titulado "Filastrocca di primavera".


A modo de conclusión, hemos de resaltar que ha sido un proyecto muy relajante para el alumnado e integrado en los distintos currículums the los países. Las materias principales implicadas han sido ciencias naturales y sociales, las lenguas, el arte y, por supuesto, tecnología digital. Un aspecto a valorar ha sido el alto interés mostrado por el alumnado por la animación a la lectura gracias a los autores trabajados a lo largo del año, como Gianni Rodari, Gloria Fuertes y Roald Dahl. Se ha creado gracias a ellos un mundo de fantasía lectora dentro y fuera del aula y han podido disfrutar de distintos géneros literarios con distintos escritores europeos.

Nuestro último compromiso ha sido realizar una valoración justa del proyecto, que hemos creado para disfrutar aprendiendo y para despertar esa motivación intrínseca por la educación. Tras esta valoración, el objetivo siguiente será continuar con nuevos retos para el curso próximo y "poner un nuevo eTwinning en nuestra clase"


viernes, 10 de marzo de 2017

Yoga in the class: The Spiral Mandala

Yoga in the class is a powerful tool you can use to improve the children well-being. This is why, we have been working on yoga this time in Natural Science in the unit: "Healthy habits". By taking moments throughout the sessions in the class to pause and practise some techniques with the children, they will gradually increase quality in their activities and they will develop a good habit.

When can we practice Yoga during the morning at school?
Since last year, some of our teachers are very interested in working on Yoga and Mindfulness at school because it has many mental and physical benefits in the class. Imagine that they start a new lesson after a very active session like sport or after the break. They feel stress and anxious after these lessons, so it is time to 'STOP'. It is better to practice some yoga techniques for some minutes and respiration exercises. After that they will be ready to start with more concentration and eager to learn.

Why Yoga in the class?
  • It is a good opportunity to develop the body, the mind and the spirit. The children and the teachers feel happy after this practice.
  • It is a non-competitive form of exercise and children enjoy.
  • It has many benefits, like strength, balance and flexibility.
  • They develop concentration, focus and attention; moreover, creativity and imagination.
  • They learn how to breath, how to relax and self-control.
  • And the most important, as they feel good, they respect for others and they can work better in the class.
In order to get a better environment during our lessons and to reduce anxiety, we can incorporate into our daily routines some minutes for yoga. We can use different techniques for breathing, a guided exercises of 'asanas' or, - very relaxed one!-, the visualization. Children enjoy with all of them and we can practice them in English or in Spanish as we want, because the language we use is quite easy and if we tell a story, we can do it according to the level of our students.

This time, we have created a game called 'The Spiral Mandala'. I gave to each child an eye to decorate and to colour according to their creativity. Then we organized the mandala in a big poster by sticking with glue each eye and a different 'asana" as an spiral shape. But, how to play?
You just need the poster,  a token, a dice and pleasant motivation.

Why the eye?

The eye is a symbol of observation and offers the evidences we need to interpret the things we have around us. The spiral is a mandala shaped, but 'infinite' because it can be seen in both directions again and again. It is perfect for meditation and to focus on an element.


How to play?
  1. A pupil throws the dices and counts from the eye in the centre to the positions (eyes) outwards.
  2. He/she explains physically the 'asana' to his/her classmates and they repeat the position during four or six breaths (inhalations and exhalations) depending on the possibilities of each one. It is important not to force the posture and to practice them in a calm and slow way.
  3. When it is finished the position, the student who threw the dice, throws it back to his/her classmates again and another student catches it (this is very funny to them) and the game continues again as before.
  4. The game finishes when we want because the mandala is 'infinite'. If we reach the end, we can start again from the last outwards eye until the achieve the central one and so on.
Don´t forget before you start yoga in the class:
Warm-up exercises
Asanas (they should be short and slowly. Don´t forget to breath properly)
Breathing exercises (through the nose)

Moreover if you want to practice more with your students you can also practice some 'Minfulness exercises' to focus attention, some relaxation or positive affirmations. This way you will have the PERFECT environment in your class to start your lesson :-) My favourite mantras for kids are:
  • Yes, I can. I can work hard.
  • I can help to others.
  • I can and I want to listen to others.
  • I am ready, I am ready.
If you want more about this experience for teachers in Spanish: 


Good luck in this adventure! 

viernes, 9 de diciembre de 2016

Merry Christmas to Europe! #eTwinning

We wish you a Merry Christmas and a Happy New Year! We are sending these Christmas Cards to different countries around Europe thanks to our eTwinning project. This time my colleague Lucía from 3rd grade and me have been working this little winter project with our students.
 Hope you enjoy them too!

¡Os deseamos Feliz Navidad y Feliz Año Nuevo! Este año estamos participando en un proyecto eTwinning y, tanto mi compañera Lucía como yo, hemos preparado estas Tarjetas Navideñas en nuestras clases para enviarlas a distintos puntos de Europa desde el Cole San Miguel de Armilla.

From  San Miguel School in Armilla. 
1st Grade A and teacher Esther Ruiz.

jueves, 27 de octubre de 2016

Parts of the Body in Science! 3rd Graders


El mes pasado trabajamos en Natural Science el tema 1  "The parts of the body" and "The stages of the life".


Es importante que los niños conozcan y acepten sus propios  rasgos corporales y los de los demás, que localicen en su propio cuerpo los órganos y que comprendan que todos los seres vivos pasan por distintas etapas a lo largo de su vida y que sufrimos cambios

 Hemos realizado unas actividades muy divertidas  y sobre todo hemos aprendido jugando.

Aquí os dejo una muestra de ello.


martes, 4 de octubre de 2016

Fotobabble in action and "My little Owl"

Why not? This last week we were working in art a project about "how to create an owl". Children loved it. However, how to promote English in art? Here you are! They had to search some information about this little animal.


  • Listen to the story about a student in 4th grade.
http://www.fotobabble.com/m/UndsMTkzREhlcVU9

So this is another option, they followed the steps to create a wonderful and creative drawing and they added an audio about the work the had done of the animal. Try Fotobabble or our San Miguel Kids Radio.
Excellent work! :-)

Print Easy Owl PDF Template

More examples about the drawings about the owl in the 4th grade?


viernes, 9 de septiembre de 2016

El próximo 26 de Septiembre...#coeEDL

No dejes pasar la oportunidad de participar en la Celebración del Día Europeo de las Lenguas el próximo 26 de Septiembre del 2016. Somos 47 miembros que podemos promover la diversidad de las lenguas.
Nuestro alumnado puede aprovecharse de ese aprendizaje lingüístico y de los beneficios de interculturalidad en pro del plurilingüismo que cada vez está más presente en los centros.

Flyer #coeEDL
Más información sobre el Día Europeo de las Lenguas

¿Sabías que...?

  • Hay más de 200 lenguas habladas en Europa.
  • 24 lenguas oficiales de la UE.
  • Aproximadamente 60 lenguas regionales / minoritarias.
  • Comisión Europea es una de las instituciones de interpretación más grandes del mundo, con más de 1.750 lingüistas y 3000 intérpretes independientes.
  • 77% de los ciudadanos de la UE comienza a aprender Inglés en la escuela primaria.
  • Muchas lenguas tienen más de 50.000 palabras, pero la mayoría de las personas sólo utilizan alrededor de 100 de ellos en la conversación diaria.

viernes, 10 de junio de 2016

SCIENCE IS FUN! MACHINES

3rd graders students know that machines make people’s lives easier. This time, they had a big challenge in our science classes because they have been working during three weeks about this topic “machines”.
The main ideas were to search, to collaborate in their common project, to prepare the planning and the machine and to explain orally all their wonderful work during this unit.
The process was focus on active methodology and CLIL. Children had to build their own knowledge and to be success in this challenge. Let’s summarize the process:


1st: A brainstorming. They shared and discussed with their colleagues what they knew about machines.
2nd: The searching of information in the class with computers by pairs. The idea was that they had to find their perfect machine… something easy to do and with simple materials. This way, dialogue and communication skills were the key for their own progress. Later they could use some digital links to learn more about the unit.

3rd: The collaborative charts. They had them in Edmodo and in a Google Drive format. This chart had different boxes with relevant information to complete.
4th: The building of the machine by pairs.
5th: The draft of the explanation of the machine. They couldn't forget the title, the materials they used when doing it, the actions they had to do during the process and the usefulness of the machine.
6th: The creation of the cards for the oral exposition.
7th: The oral presentation in English. They had to practice pronunciation, intonation and good speech and gestures, such as looking to the audience. We visited the classrooms of 2nd and 4th graders.
8th: Fun during the classes. Happiness, motivation and good mood were our three best ideas to keep on going with our work each day.


Here you are the results!
Enjoy and remember that SCIENCE IS FUN!

lunes, 9 de mayo de 2016

Integrated Prehistory Project! 3rd and 4th graders in action!

Prehistory is a good option to create an integrated project, such as social science, English and Spanish languages, art and ICT. This is why some teachers planned together a great project to create a real class environment, to motivate our students and to give them an opportunity to learn with a smile in their faces. This time our 3rd and 4rd graders had to work on these objectives:
  • To situate the prehistoric period on the timeline.
  • To learn and to use the vocabulary about this topic.
  • To desmostrate their understanding of the prehistoric life through art, creative reading and writing and our podcast for San Miguel Kids Radio.

The key questions were: 
  1. When did the Prehistoric period begin? When did this period end?
  2. What was it like to live in prehistoric times?
  3. Who were the first settlers in Spain?
  4. What do we mean when we say that people were hunters or gatherers?
  5. When and why did people start to live in caves?
  6. When did people start to farm? Were they nomads or sedentary?
  7. What did early humans make their tools with?
  8. Why did early people make cave paintings?
  9. What were the differences between the Palaeolithic, the Neolithic and the Metal Ages?

Art lesson: Kids created drafts of drawings about the Prehistory, such as animals, the hunt, tools and other situations that brought to their minds Prehistory. For this task, they could use computers in the classroom and they played with some links in Social Science.
After the drafts, they prepared paints, brushes and paper and they started to create the wonderful posters for our BIG CAVE in the corridor of the school.

Our wall panel was the best place to display a presentation about Prehistory with some their drafts about the prehistoric drawings. Have a look to this roof! Isn't is awesome?


Social Science lesson: Some activities that helped to my 3rd graders' kids to learn better in a funny way meanwhile reading and writing were these two examples. By pairs, they had to discuss how to organize the strips of paper to order the different periods during Prehistory. 
The second activity was more difficult, we offered them some key information about the periods of  Prehistory and had to complete their own chart.
+
Mrs. Talero's students improved their research about reading and writing about Prehistory with this flipbook. This final product had different sections and the idea was that the kids tried to use an easy English through short sentences and clear vocabulary. 


ICT lesson: They explored Prehistory with a bank of  interesting  links.

Spanish lesson: The idea was that children wrote some texts about how could be a day if they were living in the prehistoric times. Do you want to see more! Let's go ahead! After that, they recorded a podcast for San Miguel Kids Radio.

viernes, 22 de abril de 2016

STEM IN THE CLASS! 3RD GRADERS IN ACTION!

STEM brings science, technology, engineering and maths to our kids in San Miguel school. They had fun and challenging in our classes during a week. We are really happy to inspire children to build on their own curiosity by engineering ideas through hands-on learning.
The secret of STEM is to tap into the students natural and innate curiosity about the real world. By simply allowing them to investigate, by encouraging them to ask questions and by working in a collaborative way!.

This time our children have been inventors of:

  1. Catapults
  2. Straw Structures Designs
  3. Structures of Solid Platonics
  4. Bridges and Roads
  5. Slingshots
  6. Boats
  7. Parachutes
  8. Other Structures they could image

martes, 12 de abril de 2016

CREATING CRAZY CRAZY STORIES!

Hoy os vamos a presentar la actividad que hemos hecho en la clase de 3º A en la cual los alumnos se han convertido, de nuevo, en escritores.  Ell@s ya saben lo que es escribir un cuento súper original y leerlo al resto de los compañeros, pero esta vez han roto el molde completamente. ¿Por qué? Preguntádselo a ell@s y os responderán que en esta ocasión la historia es un poco loca.

La finalidad de esta actividad es, además de desarrollar la capacidad de trabajar en grupo, mantener el orden y respetar a los compañeros, romper los esquemas que a todos nos viene a la mente cuando pensamos en un cuento y dar un pequeño hueco al sinsentido que tan poco presente está en el aula. Pudiéndo ser este un buen momento para crear una atmósfera de risas al mismo tiempo que se trabaja la escritura y se deja volar la imaginación.

Expliquemos los pasos que han seguido para conseguir estas graciosas historias con poco sentido:
1- Se colocan en grupos de cinco.
2- Cada alumno tiene que pensar en su mente un protagonista, una breve descripción, un lugar donde ocurran los hechos, un problema o nudo y un final o resolución de dicho problem.
3- Se explica el proceso a seguir. Cada alumno recibirá un folio en blanco que tendrá que colocar en horizontal. Todos tendrán que escribir en la parte de arriba su protagonista. Hecho esto, lo doblarán hacia atrás para que al pasarlo a su compañero de la derecha, éste no vea lo que ha escrito. Luego, cada alumn@ habrá recibido el folio de su compañer@ de la izquierda. Dicho folio ya tiene el protagonista escrito pero no s epuede ver ya que está doblado hacia atrás. En la parte de arriba de ese papel doblado, tod@s escribirán ahora algunas características (breve descripción) del personaje que tenían en mente . Una vez hecho esto, lo vuelven a doblar y lo pasan a su compañero de la izquierda de nuevo. La tercera cosa que tienen que escribir es el lugar donde está su protagonista, volver a doblarlo hacia atrás y pasarlo a su compañero d ela derecha. A continuación, escriben el problema o el reto al que se enfrenta su personaje, hacen el dobles y lo pasan. Finalmente, escriben el desenlace de sus historia.
4- Una vez hecho esto, cada alumn@ lee el papel que le ha tocado. Todas las historias resultantes son una mezcla de las ideas de l@s alumn@s de dicho grupo. ¡ Las risas están aseguradas!
5- El último paso será leer las historias locas a toda la clase e intentar imaginarlas. ¡Supone un verdadero reto ya que algunas son totalmente disparatadas!

Echadle un vistazo a una de las producciones de la clase:

viernes, 11 de marzo de 2016

Dictado bilingüe: ¡Una misión posible!

 Uno de los retos de la enseñanza bilingüe es el de hacer un dictado en inglés, independientemente del área en el que estemos trabajando.
¿Por qué? Empezaremos diciendo que no es su lengua materna por lo que no la conocen tan bien ni la usan tan a menudo. Además, todos sabemos que en inglés las palabras se escriben y se pronuncian de una forma diferente a como lo hacemos en español. Por eso, es muy importante el trabajo previo sobre el texto en inglés.
Los alumnos de 3º A y B están muy acostumbrados a hacerlos y son diferentes los métodos para trabajarlos. Veámos en esta ocasión cómo lo hemos hecho en el tema de la materia o, como nuestros alumnos ya saben, "The Matter".
En un primer lugar trabajamos sobre el texto en inglés. Para ello, la profesora lee cada oración y los estudiantes lo repiten. Tras esto, se resuelven dudas de vocabulario y se procede al "gap reading". Hagamos una pausa, ¿qué es el "gap reading"? Este tipo de lectura, hace que los alumnos centren su atención en el texto y en la lectura de determinadas palabras, ya que, ellos tendrán que leer la palabra que toque cuando la maestra/o pare en la lectura. Una vez que el alumnado se ha familiarizado con la pronunciación, cada uno leerá un frase del texto. Finalmente, mientras el maestro/a copia en la pizarra las oraciones del dictado desordenadas, el alumnado lee en silencio el texto de nuevo.
Ahora, ¡manos a la obra! ¡Es hora de hacer el dictado usando algunas de las frases que hemos seleccionado del texto trabajado!.
Para terminar la actividad, pasaremos a corregir lo que los compañeros/as han escrito de manera cooperativa. Un voluntario/a será el coordinador de dicha actividad y preguntará a sus compañeros que le lean las oraciones del dictado en orden, para lo que le tendremos que facilitar la pregunta en inglés a modo de retroalimentación. Al mismo tiempo el coordinador/a estudiante irá numerando las oraciones de la pizarra. Por último, el alumnado comprueba los posibles errores y corrigen lo que sea necesario. 
Et voilà !
Ya tenemos nuestro dictado terminado.
Great job kids!


martes, 19 de enero de 2016

WATER EXPERIMENTS DAY !


WATER EXPERIMENTS DAY!


¡Hagamos algunos experimentos con agua! Pero, ¿para qué te vas a complicar la vida con experimentos? Este puede ser el pensamiento de muchas personas, pero no es tan difícil como parece. Requiere algunos pasos previos y un poco de organización, pero los alumnos están altamente comprometidos con esta experiencia porque, simplemente, les encanta. Ellos son los que están “con las manos en la masa” y el estar “pringados” los motiva.

Además, si los experimentos los hacemos en inglés, mejor que mejor. Y este ha sido nuestro caso. Así que hoy hemos aprendido algunas palabras nuevas y también hemos practicado vocabulario que nuestros alumnos ya sabían como por ejemplo vaso, recipiente, cucharon, cuchara, agua, colorante y los colores, entre otros.

Antes de comenzar, hemos hecho un brainstorming sobre el agua. Y los alumnos han comentado todo lo que sabían acerca de dónde podían encontrarla, para qué servía, cómo cuidarla, etc. Una actividad muy interesante para organizar y darle forma a toda la información que ellos tienen en su mente.

Veamos entonces los experimentos que nuestros científicos de 3º  han llevado a cabo y sus relaciones con nuestro entorno. También podéis visitar esta web http://elperchero3.blogspot.com.es/2016/01/science-is-fun-water-experiments-3rd.html donde la seño Yolanda ha hecho un fantástico video repasando todos los experimentos que a continuación os explico:

1. Compare the sizes of containers by filling glasses of water
Inicialmente tenemos dos vasos iguales con la misma cantidad de agua pero al pasar el contenido a vasos con formas diferentes, vemos que el agua no está al mismo nivel. Pero, ¿tenemos diferente cantidad de agua? Los alumnos de tercero ya saben que no porque lo comprobaron volviendo a echar el agua en los vasos iniciales, viendo así que las cantidades seguían siendo iguales.

2. Create a melody with coloured water
Para hacer nuestras propias melodías sin necesidad de instrumentos musicales, solo necesitamos seis vasos, agua, colores y una pala de madera. Primero, rellenamos cada vaso con distintas cantidades de agua. A continuación, se les echa un poco de pintura y se mezcla bien para que cada vaso tenga un color característico. Y, finalmente, ¡manos a la obra, artista!

3. Predict which objects sink or float & Avoid water pollution
Tenemos diferentes materiales como son un corcho, palillos de madera, canicas, piedras y papel. ¿Cuales flotan y cuáles se hunden? Los alumnos tienen unas ideas previas que comprobarán echando dichos materiales en un recipiente. Y algunos alumnos se sorprenderán al ver lo que sucede.

4. Watch as air pressure forces water into a glass
Llenamos un plato de agua con colorante  y ponemos una vela en el centro. Con cuidado ponemos un vaso de cristal sobre la vela y esperamos. ¿Qué sucede? Como muchos compañeros imaginaron la vela se apaga pero ¡también nos dimos cuenta de que el agua dentro del vaso sube de nivel!

5. Mix oil and water and watch the density of liquids
Vertemos en un recipiente agua y aceite para darnos cuenta de que aunque ambos sean líquidos no se mezclan, sino que permanecen en alturas diferentes. Esto es lo mismo que ocurre cuando se derrama petróleo de un barco en los mares u océanos. Además, analizamos sus desastrosas consecuencias, como son la muerte de muchos seres vivos acuáticos y la contaminación de otros tantos, afectando así a todos  los componentes de la cadena alimenticia.

6. Surprise! Gravity water!
Algo que sorprendió mucho a los chicos y chicas de tercero fue lo demostrado con este experimento. Para llevarlo a cabo, llenaron un vaso de agua hasta el borde. A continuación, pusieron un plato de plástico encima y , rápidamente, lo giraron. ¡El agua no se cayó!

7. Creating our own volcano
Para conseguir un fantástico volcán necesitamos agua, vinagre y bicarbonato. Echamos el agua y el vinagre en un vaso y, a continuación, vertemos una cucharada de bicarbonato. ¡Tened cuidado! Porque hacen reacción y sale mucha espuma ensuciando todo a su paso.

8. Drinking with a straw
Tenemos el siguiente reto: Beber de un vaso con una pajita pero sin chuparla. ¿Cómo lo hacemos? Los alumnos de tercero os responderán sin ningún problema, ¡ellos ya lo han hecho! Primero, metes la pajita en el vaso. Después, tapas la boquilla de la pajita con el dedo y, sin quitar el dedo de donde está, pones la pajita encima de tu boca. Finalmente, retiras el dedo y el agua caerá a tu boca.

Y así, señores y señoras, es como nuestros alumnos de tercero han aprendido nuevos conocimientos relacionados con el agua. ¡Espero que hagáis algunos de estos experimentos en casa!